Is you car due for a service? Have you ever wondered how difficult it really is to perform an oil change on a car? Is this a task only to be conducted by a high priced auto service centre or can it be done at home? Read on! It’s a lot easier than you think.
I serviced both my cars this past Saturday afternoon, a 320i & 330d (The Beast) E90 BMWs. This post will cover the oil change, oil and air filter replacement on the 330d, including how to reset the service warning.
First steps
I had the engine washed prior to commencing with the service. It’s not necessary, but I am a little obsessive about keeping the engine compartment clean. I only began working on the car once I was sure that the engine had cooled down sufficiently.
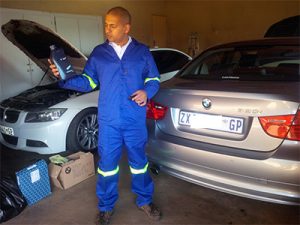
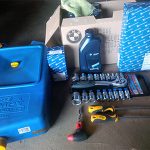
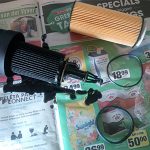
I assembled the parts and tools making sure I had everything I needed before taking anything apart on the car.
The oil change
The gallery below details all the steps involved:
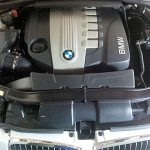
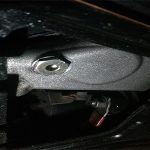


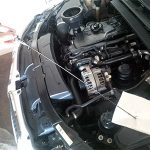
I started by removing the engine covering. This is the large cover with the BMW logo. To release simply hold from the front, pull upwards and then forward. This exposes the engine, particularly the oil filter housing on the top right of the engine.
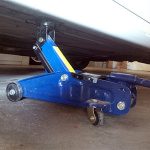
I then placed a jack under the correct jacking point in order to raise the car high enough that I could get under it comfortably. This car is quite low as it has the M Sport package.
I then selected a short flat headed screw driver (to release the plastic cover protecting the drain nut), the correct socket to fit the oil drain plug (17mm) and the Sumpy (a plastic container to collect the used oil) and got myself under the vehicle.
I first released the plastic cover, then got the socket spanner in position over the oil drain nut and turned it. This nut can be opened at least halfway or until it can be turned by hand before any oil will begin to flow. As soon as I could turn it by hand, I placed the Sumpy directly under the nut and removed it completely, releasing the used oil.
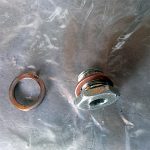
While the oil drained, I cleaned the drain nut and replaced the copper crush washer (supplied with the new oil filter).
Once all the oil had drained, I replaced the drain nut carefully, turning by hand at first and then by the spanner. This has to be done carefully to prevent cross threading the nut which will damage the threads. I then closed up the plastic cover and removed the jack. I was done working under the car.
Replacing the oil filter, oil and air filter
Next, I replaced the oil filter, topped up the oil and replaced the air filter as shown in the gallery below:
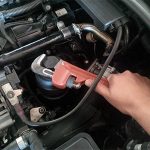
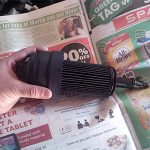
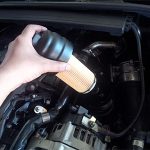

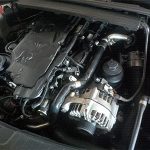
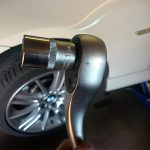
I used a monkey wrench to open the oil filter housing and removed the old filter being careful not to drip oil all over the engine compartment. I placed this on a newspaper. The old filter is simply pulled off and the new one pushed in. The new filter comes with some rubbers supplied which fit onto the filter cover. I did not replace this as the old one was fine.
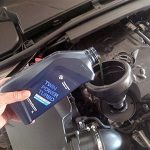
I fitted the new filter into its housing, carefully tightened the cap and proceeded to pour in the new oil using a funnel so as to avoid spillage. This car has a dipstick so I was able to check the level of the oil quite easily.
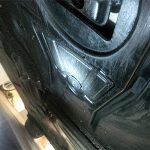
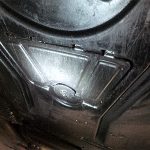
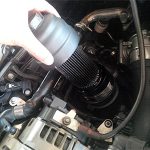
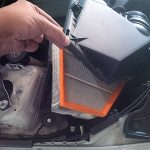
Next, I replaced the air filter. The filter box is held closed by three hand release clips and fitted the engine cover.
Resetting the service warning
The gallery below details the steps involved in resetting the service warning:


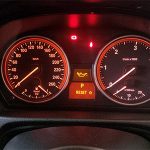

To begin, sit in the driver’s seat and close the door. Insert the key fob and press the start button WITHOUT your foot on the brake. Next, press and hold the little stick below the speedometer (the one used to zero the trip counter) until a triangle with exclamation mark appears on the instrument cluster. The scroll using the scroller control on the left stalk (the stalk with the BC button) until the oil can symbol appears. Next, press the BC button and the word “reset” appears on the instrument cluster. Now press and hold the BC button. You will see a little clock symbol displayed. Once this appears, release the BC button. A few seconds later, the service warning will be cleared.
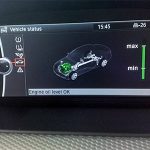
Since my car is equipped with a central display screen I was also able to verify the oil level after starting the engine.
And that is how you service a BMW 330d. Easy, isn’t it?
Our BMW tour through bear mountain inn rocky in and out rocky mountain national park. Check out our video: https://youtu.be/_EggxYTqUj4
Thanks for sharing this nice blog about oil changing.Oil changing is an important part in Vehicle.By changing oil we keep our engine efficient and also keep it clean,Oil change should be done in intervals of running 7000miles.Always try to use premium synthetic quality oil for your engine.Oil can give best mileage to vehicle and the engine is healthy.In running of 7000miles the oil change should not be more than two times.There are step by step process for oil changing for information please visit http://www.foreignaffairsauto.com/
Great blog,First person to actually go through the complete steps clearly.Did my first change with this info,(THANX).I totally agree ,as my 330d is also M-Sport package,what a beast.Giving all these V-8 Holdens & Fords a lesson in power really gives me a smile from ear to ear.They cant believe its a 6 cyl Diesel.
Great write up and pics. Thank you man. Will be servicing my E90 330d this weekend.
Thank you very much for sharing, I learned a lot from your article. Very cool. Thanks. nimabi
Thanks for sharing. I read many of your blog posts, cool, your blog is very good.
Thank you for your sharing. I am worried that I lack creative ideas. It is your article that makes me full of hope. Thank you. But, I have a question, can you help me?
Can you be more specific about the content of your article? After reading it, I still have some doubts. Hope you can help me.
Thank you for your sharing. I am worried that I lack creative ideas. It is your article that makes me full of hope. Thank you. But, I have a question, can you help me?
Your point of view caught my eye and was very interesting. Thanks. I have a question for you.
Can you be more specific about the content of your article? After reading it, I still have some doubts. Hope you can help me.
Thanks for sharing. I read many of your blog posts, cool, your blog is very good.
Thanks for sharing. I read many of your blog posts, cool, your blog is very good.
I don’t think the title of your article matches the content lol. Just kidding, mainly because I had some doubts after reading the article.
Your article helped me a lot, is there any more related content? Thanks!
Thank you for your sharing. I am worried that I lack creative ideas. It is your article that makes me full of hope. Thank you. But, I have a question, can you help me?
Can you be more specific about the content of your article? After reading it, I still have some doubts. Hope you can help me.
Thank you for your sharing. I am worried that I lack creative ideas. It is your article that makes me full of hope. Thank you. But, I have a question, can you help me?
Can you be more specific about the content of your article? After reading it, I still have some doubts. Hope you can help me.
Can you be more specific about the content of your article? After reading it, I still have some doubts. Hope you can help me. https://www.binance.com/ru/register?ref=V3MG69RO
Thank you for your sharing. I am worried that I lack creative ideas. It is your article that makes me full of hope. Thank you. But, I have a question, can you help me? https://accounts.binance.info/en/register?ref=JHQQKNKN
I don’t think the title of your article matches the content lol. Just kidding, mainly because I had some doubts after reading the article.
Your point of view caught my eye and was very interesting. Thanks. I have a question for you.
Your point of view caught my eye and was very interesting. Thanks. I have a question for you.
I don’t think the title of your article matches the content lol. Just kidding, mainly because I had some doubts after reading the article.
I don’t think the title of your article matches the content lol. Just kidding, mainly because I had some doubts after reading the article.
Your point of view caught my eye and was very interesting. Thanks. I have a question for you.
Thanks for sharing. I read many of your blog posts, cool, your blog is very good.
Can you be more specific about the content of your article? After reading it, I still have some doubts. Hope you can help me.
I don’t think the title of your article matches the content lol. Just kidding, mainly because I had some doubts after reading the article.
Thank you for your sharing. I am worried that I lack creative ideas. It is your article that makes me full of hope. Thank you. But, I have a question, can you help me?
Fantastic beat ! I wish to apprentice at the same time as you amend your web site, how can i subscribe for a blog website? The account helped me a appropriate deal. I were tiny bit acquainted of this your broadcast provided vivid transparent idea
Yesterday, while I was at work, my cousin stole my iPad and tested to see if it can survive a thirty foot drop, just so she can be a youtube sensation. My iPad is now broken and she has 83 views. I know this is totally off topic but I had to share it with someone!
Appreciating the persistence you put into your blog and in depth information you provide. It’s awesome to come across a blog every once in a while that isn’t the same unwanted rehashed material. Excellent read! I’ve saved your site and I’m adding your RSS feeds to my Google account.
whoah this blog is great i love reading your articles. Keep up the good work! You know, lots of people are hunting around for this info, you can help them greatly.
Can you be more specific about the content of your article? After reading it, I still have some doubts. Hope you can help me.
I don’t think the title of your article matches the content lol. Just kidding, mainly because I had some doubts after reading the article.
Hi there this is kinda of off topic but I was wondering if blogs use WYSIWYG editors or if you have to manually code with HTML. I’m starting a blog soon but have no coding skills so I wanted to get guidance from someone with experience. Any help would be enormously appreciated!
I get pleasure from, cause I discovered just what I was looking for. You’ve ended my 4 day lengthy hunt! God Bless you man. Have a nice day. Bye
magnificent post, very informative. I’m wondering why the other specialists of this sector do not notice this. You must continue your writing. I’m sure, you have a huge readers’ base already!